Ditching the Big Guys: My Local Food Journey (and Why You Should Too!)

Tired of the same old grocery store routine, especially when big chains like Loblaws are raking in record profits? Same! Lately, I’ve been on a mission to support local businesses and buy more food directly from producers here in London (and surrounding areas!).

It all started with a trip to Covent Garden Market, where I discovered the amazing Chris’s Country Cuts. The quality of their meat is unreal, and it’s honestly cheaper than what I was getting at the big chains. Plus, supporting local feels great – especially considering there’s a Canada-wide boycott planned for May to protest these big grocers’ price gouging and shady practices!

Now, my fridge is a celebration of Ontario goodness: fresh eggs, honey and veggies delivered weekly from Great View Orchards (free delivery, score!), and top-notch flour, barley, and coffee from Arva Flour Mill. (Their amazing locally roasted coffee is served in their cafe onsite!) Everything tastes better, keeps me fuller for longer, and lets me know exactly where my food comes from.

We’re still figuring out the dairy situation, but that’s next on the local food adventure list. The point is, even small changes can make a big difference. You might be surprised at the quality and affordability you can find by shopping local!

So next time you’re grabbing groceries, consider exploring your local farmers markets or independent shops. Your taste buds (and your wallet) might thank you for it, and you’ll be joining a movement to support local producers and fight back against unfair practices.

Until next time friends…

A Healthy, Healing Garlic Broth – Recipe

This year started out rough, (not self-induced…LOL!) Again with the fever, etc…! So I dragged my butt into the kitchen and made Garlic Broth. This humble broth is as frugal as it is simple to make and the health benefits are worth the effort.

Garlic Broth has become the star of my kitchen. Its uses are endless. Use it in recipes instead of chicken or beef broth. When you’re tight on time you throw in some fresh pasta, lentils or black beans, greens, seasonings and a splash of lemon. It’s a hearty meal on the run. Gravy made with garlic broth is amazing! It’s uses are only limited by your imagination so have fun with it.

My husband loves Mac and Cheese night and it’s healthy-ish… I replace half of the pasta with cauliflower or broccoli and to cut a little fat I replace half of the milk with Garlic Broth. It’s a beautiful flavor.

Let’s not forget the health benefits of garlic. When you add sage and ginger you easily create a healing broth. Nature’s antibiotics and tums rolled into a hot mug of delicious liquid.

Okay, enough gushing, here’s the recipe:

Healing Garlic Broth

This garlic broth recipe is a simple yet flavorful concoction, made by simmering whole and sliced garlic cloves in a rich broth, infused with the aromatic touch of fresh sage leaves. Perfect for sipping on its own or as a base for other dishes, this broth offers a comforting and healing experience with every spoonful.
Servings 1.5 Quarts

Ingredients
  

  • 2 heads garlic
  • 1 or 2 stalks fresh herbs of your choice (I love sage)
  • 1 tbsp olive oil
  • 2 quarts water

Instructions
 

  • Pull apart, peel and smash one full head of garlic. Heat the olive oil in a large pot on medium. When it sizzles add the garlic and cook until golden brown, about 10 minutes.
  • Cut the second head of garlic in half width wise so that you have cut each clove in half. Add the water, garlic (skins and all) and herbs to the pot and bring it to a boil. Turn it down and let it simmer, uncovered, for about 45 minutes or until it has reduced in volume by about 25%.
  • Strain through a fine sieve and glory at it's wonder.

Notes

You may have noticed my recipe doesn't call for salt. My reason behind this is that you don't always use the same amount of salt in dishes so I like to adjust it when I use it.

There you have it. Use it right away, keep it in your fridge, can it or freeze it. Whichever method suits you.

Tip: If you are short on room in your fridge, freeze the broth in ice cube trays. When they are frozen store them in zip-lock bags in your freezer but use them up within a couple of weeks to avoid freezer burn.

I love keeping this broth having this broth on hand. It not only adds wonderful flavour to dishes but it’s also perfect for colds and flu.

Until next time friends…

Growing Sweet Potatoes on My Balcony

Hi everyone! I’ve got a fun little experiment going on – I’m trying to grow sweet potatoes on my balcony! It’s either going to be a great way to grow some food or I’ll end up with a lovely decorative plant. Either way, it’s a win!

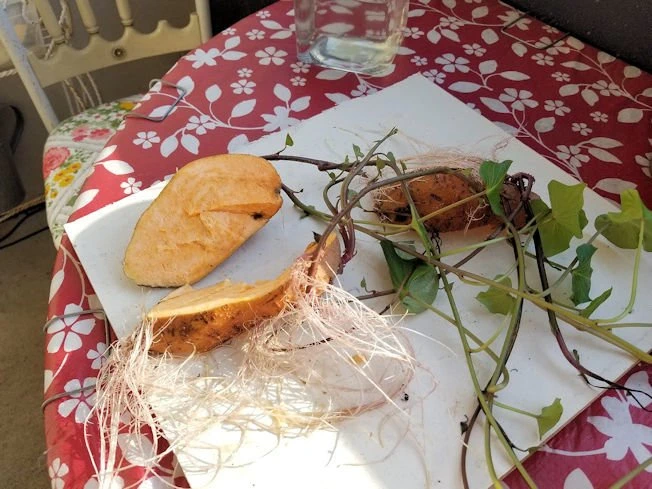
You see, I usually keep my sweet potatoes on top of the gallon jars where I store beans and pasta. And, well, sometimes one of them escapes my notice. So, imagine my surprise when I spotted a vine peeking out from above the jars! At first, I was a bit bummed about losing a sweet potato, but then I picked it up and saw it was growing roots and a vine. Who knew a sweet potato could start growing right in my kitchen?

Not really sure what to do with it, I popped it in a vase of water just to buy some time. Fast forward a week, and this little sweet potato was thriving! That’s when I decided to turn this into an experiment and see what happens.

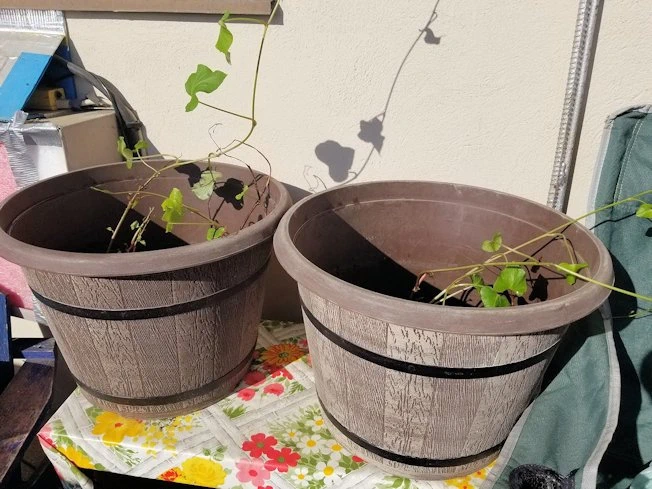
I live in an apartment on the 8th floor but I face west. Lots of hot sunshine beams down my balcony. Perfect for sweet potato…..I think.

As you can see I need more soil but sadly will that have to wait a few days. I’m hoping that, like a potato, I can add the soil up the stem and all will be well. They will like it much better to have the sun actually beating down on their beds but we will see.

Stay tuned for updates on my sweet potatoes…… Here’s hoping they grow.

Until next time friends…

Easy Peasy Chicken Schnitzel – Recipe

Hey everyone! Do you ever have those evenings where you just crave some good old comfort food? Something that takes you back to your childhood and those carefree days? I remember when I was young, my friend’s mom used to make the most amazing schnitzel. I wasn’t a big fan of the cabbage and dough noodles that came with it, but I always looked forward to dinner at her house.

Fast forward a few years, and I learned how to whip up schnitzel for my own kids. It’s surprisingly easy to make and so versatile. Feeling Italian? Just add some marinara sauce and a sprinkle of Parmesan. Get creative with it! My personal favourite is to top it with sautéed mushrooms, a bit of steamed spinach, a dash of nutmeg, and a squeeze of lemon juice. It’s simply delicious!

Chicken Schnitzel

This Chicken Schnitzel recipe features tender chicken breasts coated in a crispy, golden breadcrumb crust. The chicken is first pounded thin, then dredged in seasoned flour, dipped in beaten eggs, and finally coated with breadcrumbs before being fried to perfection. Serve this delicious schnitzel with a lemon wedge and a side of your choice for a satisfying meal.
Servings 2 servings

Ingredients
  

  • 2 breasts chicken skinless, boneless
  • 1 cup flour
  • 1 cup breadcrumbs
  • 2 eggs
  • 1 tsp paprika
  • 1 tsp oregano
  • 1 tsp thyme
  • 1 tsp garlic powdered
  • 1 tsp salt
  • 2 tbsp butter
  • 2 tbsp oil I like olive oil

Instructions
 

  • Prepare to coat the chicken: Place flour on one dinner plate and breadcrumbs on another. Mix the spices with either the flour or the breadcrumbs. Crack two eggs into a pie plate and beat them roughly. Arrange the plates near the stove in this order: flour, eggs, and breadcrumbs for efficiency.
  • Pound the chicken: If storing chicken breasts in individual zip-lock bags, leave the chicken in the bag and pound it with a tenderizer until about a half inch thick. Alternatively, you can use two pieces of plastic wrap.
  • Preheat the oven: Heat your oven to 200 F to keep the cooked schnitzels warm while frying the rest.
  • Coat the chicken in flour: Place the chicken flat on the flour plate, ensuring it's completely coated on both sides. Shake off any excess flour.
  • Dip in egg: Transfer the floured chicken to the egg plate, coating it thoroughly on both sides. Gently shake off any excess egg.
  • Coat in breadcrumbs: Move the chicken to the breadcrumbs plate, covering the entire surface. Turn it over and press breadcrumbs into all the nooks and crannies.
  • Fry the schnitzel: Place the breaded chicken in a hot frying pan. Cook for 4 to 5 minutes on each side until golden brown and springy to the touch.
  • Keep warm in the oven: Once cooked, transfer the schnitzel to the preheated oven along with any potatoes or sides you're preparing.
  • Repeat the process: Bread and fry the next chicken piece following the same steps.

That’s all there is to it! Plate up and enjoy.

Don’t feel too guilty about the fat content. You may have noticed that the entire meal was cooked using the same butter and oil. After I was finished cooking there was about two tablespoons of it left in the pan. I probably wouldn’t eat this meal every night but once or twice a month makes it guilt free to me!

Quick & Easy Chicken Mushroom Pasta – Recipe

Hey everyone! You know when you need a meal that’s quick, easy, and delicious? That’s when I turn to my trusty all-in-one pot pasta meal! It’s funny, I’ve been making this for years, and now it’s suddenly the latest trend – makes me chuckle every time!

Just a couple of nights ago, I roasted a super tasty chicken and made some broth from the leftovers. Tonight, I’m whipping up another speedy dinner. It’s all cooked in just one pot and takes about 30 minutes from start to finish. The best part? This recipe is super versatile. You can toss in any leftovers you’ve got or whatever you’re in the mood for. It’s a lifesaver on those busy evenings!

Quick & Easy Chicken Mushroom Spinach Pasta

This Quick & Easy Chicken Mushroom Spinach Pasta is a delicious, one-pot meal that combines tender chicken, savoury mushrooms, and fresh spinach with pasta in a light, creamy sauce. It's a perfect dish for a fast, flavorful, and satisfying dinner.
Servings 4 servings

Equipment

  • 1 large pot I use a 5 quart

Ingredients
  

  • 1 tbsp olive oil
  • 1 tbsp butter
  • 2 cloves garlic minced
  • half medium onion diced
  • 1 medium carrot cubed
  • 1 lb pasta (your choice)
  • 5 or 6 mushrooms sliced
  • 1 breast of roast chicken (or raw or rotisserie)
  • 1 tsp oregano dried
  • 5 leaves fresh sage (or 1/2 tsp dried)
  • 2 hand fulls fresh spinach
  • 3 cups chicken broth
  • 1 tbsp all purpose flour

Instructions
 

  • Fill the pot and cook your pasta according to the box instructions, drain and set aside.
  • Heat your pot until a drop of water dances (not sizzles) around the pot. Add the olive oil and butter. Put your chicken breast in the pot and give it a 2 or 3 minute sear, or until you see nice brown. Remove and set aside.
  • Add the sliced mushrooms to the pot, careful not to crowd them. (Do in two batches if necessary) When you see moisture on the mushrooms it's time to turn them over. Once they have a nice brown remove them and set aside.
  • Add the onion, garlic, carrot, sage and oregano to the pot and saute until the onions are tender.
  • Sprinkle the flour over the veggies and mix. Let them cook a minute or two to cook the "floury" taste out.
  • Add the broth one cup at a time until it has thickened to your preference.
  • Slice or dice and return the chicken and mushrooms to the pot and mix.
  • Add the spinach on top and put on the lid. Let this wilt for about 2 minutes.
  • Remove the lid, gently stir in your pasta to reheat it and serve.

Notes

You'll notice I didn't add salt. If you're using commercial broth it's plenty salty. If not add salt to your own taste.
So there you have a guide to a One Pot pasta meal. Don’t be afraid to mix and match ingredients. The carrots I used tonight were leftover roasted carrots from the Roast Chicken. This meal is yummy with beans instead of meat or you can use just vegetables. Whatever you enjoy.

Serve it topped with some Parmesan cheese or a nice cheddar or just salt and pepper. It’s up to you. Enjoy!

Until next time friends…

Making Bread with Dad – Simple Bread Recipe

Hey everyone! I’ve noticed that some folks are a bit hesitant about making bread, thinking it’s too much effort with all that kneading and rising. But let’s talk numbers – homemade bread can cost around $1.25 compared to store-bought at $3.00. Imagine the savings over a month! Every little bit counts, right?

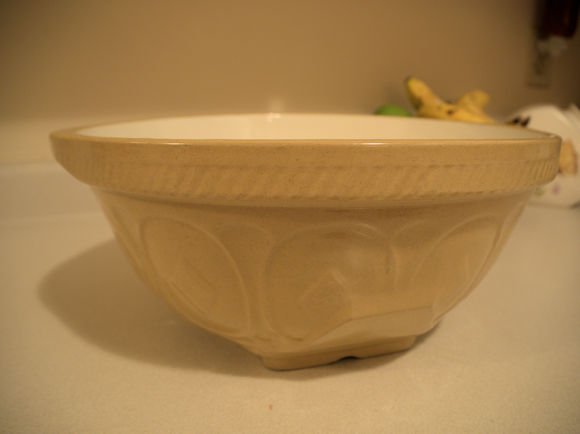
And here’s a little secret: making bread is special to me. It’s like having my Dad close by, especially when I use his old antique mixing bowl. It’s almost like getting a big hug from him! Dad was a master at bread-making, and I feel that tradition lives on every time I bake.

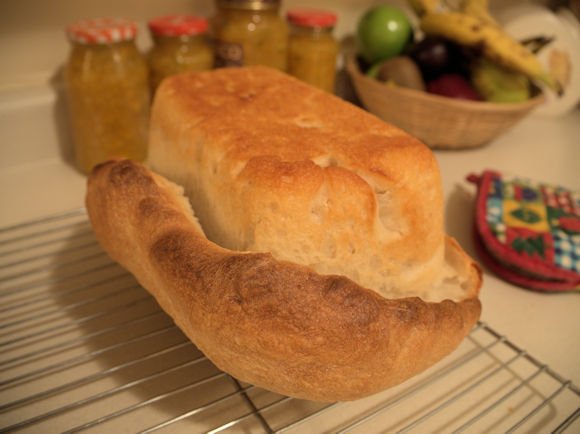
Loaf of Bread
The Old Bowl

I’m excited to share with you a simple, no-knead bread recipe that’s practically fail-proof, as long as you use good quality ingredients – they really are the key!

First things first, let’s talk about yeast. If you’ve got a packet that’s been sitting in your cupboard since forever, it’s time to say goodbye to it. Fresh yeast is essential for great bread – it doesn’t have to be fancy or expensive, just fresh. And don’t skip proofing your yeast! It’s better to test a small amount than to risk a whole batch of bread, right?

Now, here’s something you might not have thought about: your water. Yup, that’s important too! When I moved from the countryside to the city, I didn’t realize how the chlorinated and fluoridated water could affect my bread. It was messing with my yeast! If you’re unsure about your water quality, try leaving it out for 24 hours to help get rid of those chemicals. I always keep a couple of 2L jugs in my fridge, so I’m prepared, but it might mean a bit of planning for some. Trust me, it’s worth it for that perfect loaf!

Dad's Simple White Bread

A freshly baked loaf of simple bread features a crisp, golden crust and a soft, fluffy interior. Its warm, inviting aroma and homemade goodness make it the perfect comfort food. Enjoy it sliced, buttered, or as the base for your favourite sandwich.
Servings 1 loaf

Equipment

  • 1 large bowl
  • 1 medium bowl
  • 1 kitchen scale
  • 1 measuring spoon 1 tsp
  • 1 wooden spoon or sturdy spatula
  • 1 plastic wrap
  • 1 loaf pan

Ingredients
  

  • 2 cups water tepid, body temp
  • 2 tsp sugar
  • 2 tsp yeast
  • 1lb 2oz flour weighed
  • butter for pans

Instructions
 

  • Plug in your kettle. Trust me you’ll see why. In the medium bowl place 1.5 cups water and 2 tsp sugar. Stir it to dissolve the sugar. Add half a cup of boiling water. The reason you don’t want to skip this step is that yeast thrives in lukewarm water. Meaning it can’t be too hot or too cold or you will kill the yeast. Sprinkle 2 tsp yeast on top and set aside for about 10 minutes. This is proofing your yeast. When it’s ready the yeast will be bubbly.
  • Weigh your flour and place it in the large bowl. (I made two loaves) Add the salt and whisk it a bit to fluff it up.
  • Once proofed add the water and yeast mixture to the flour and stir, beat, move around until it is well mixed. You will notice it’s quite sticky. Trust me… continue on. This is different from any other way I’ve made bread before.
  • Cover with plastic wrap and set in a warm, draft free space. I like to use the oven. Set your oven to the highest heat for about one minute and then turn it off. Put your bowl in the oven. Perfect! Let rise for 1 hour or until doubled.
  • Once you have achieved the first rise you want to release some of that air. Using your wooden spoon pull the dough from the edges of the bowl and fold it in on itself. Go all the way around the bowl until you have deflated a good portion of the air pockets.
  • Butter your loaf pan or whatever vessel you choose and put the dough in. In the picture above please note…. this is too full. LOL! I wasn’t paying attention but it’s a good lesson that shows you it really doesn’t have to be perfect. As you can see I made two loaves. Because the dough is sticky it’s tricky to split the batch so just do your best. Sometimes I add a little more flour to the mix so that the second rising won’t spill over the edge of the pan.
  • Preheat the oven to 425 degree F. and place the bread somewhere close by. Let rise for about 30 minutes.
  • Once it has risen place it in the oven for 15 minutes.
  • At the 15 minute mark turn the heat down to 375 degree F. and continue cooking for 17 minutes.

Notes

Always Weigh Your Flour.
I hope you noticed that I listed the flour by weight. It’s important to note that weighing your flour gives you a much better product. Flour tends to settle and compact somewhat during shipping and handling so it’s hard to say what volume of flour is in a cup. AND once you feel comfortable with this recipe you can play around with different flours as long as you have the correct weight. I like to grind Roger’s Porridge blend in my food processor to create a flour. It’s tasty and I know it’s healthier than white flour.

As you can see it’s not perfect. LOL!! Not sure what happened…. I was probably paying too much attention to my camera and not enough to the bread. Oh well. The Run-over was yummy when I cut it off and buttered it. Nice and crispy! Sometimes it comes out as planned and sometimes it doesn’t. Either way it’s still yummy!

Let the bread completely cool before bagging it. I usually make two loaves. I leave one bagged loaf out on the counter and put the other one in the freezer. Easy as can be. I hope you enjoy making this bread.

Until next time friends…